How is building the Goat Island Skiff kit different from building with just plans?

The Goat Island Skiff kit builds differently than the boats built from just plans.


A Calendar Islands Yawl 16 being built upside down over a building jig which comes precut in the kit. Believe it or not, the CIY was heavily inspired by the GIS and a guy who sailed the heck out of a GIS he built, Christophe atson.

Any modern wooden boat designed these days is drawn in the computer, modeled and rendered in such a way that enables the boats to made into a kit. What does that mean? It could be as simple as using the computer software to generate 2D geometry representing the molds of a boat so that they can be precut on a CNC router. In this case perhaps, the boat builder(s) sets up a strongback the traditional way, spaces out the molds on the "building jig” and planks the boat. Or the designer can go further and model the strongback and building jig itself such that those components of the jig are precut on a CNC machine. The interior of the boat can be patterned on the shop floor and all the transverse structural parts cut by hand from stock, or all that structure can not only be modeled in the computer and precut on the CNC but it is then set up as part of the strongback/building jig so that after planking when the boat is flipped, all the structure is included in the hull. Going further, hardware for the boat can be patterned and fabricated but a serious designer on the computer can model those pieces in their CAD program and export files that allow castings to be 3D printed or pieces of hardware laser cut and welded together.

Mark Nye’s kit components all prepped. Ready to go 3D!

All of this is to say that my goal was to make a GIS kit that took full advantage of the methods available with computer aided design and CNC cutting.

The first GIS kit was a package of precut parts based on the same geometry that a plans builder cuts by hand. The geometry that Mik Storer drew and dimensioned in the plans was available as a file we call a DXF which is essentially the CAD’s world equivalent of a PDF. With those files imported into my software and cleaned up (there is always careful fairing and checking to do when a file is imported from another system), I could then program the parts to be cut on my CNC router. I did that for a couple years. One Goat named GIR is a well known product if this early kit offering.

Besides the time savings to the builder - indeed there was a lot of plywood cutting they did not have to do saving them time and cutting mistakes for sure - there wasn’t anything I can point to that made this first generation GIS kit truly special. During this time period I was experimenting with what I now call the Tab-n-Lock system. With that system proven out on a few other of my skiff kits as well as my NS Scarf, I decided to redesign the GIS kit to create what ships today.

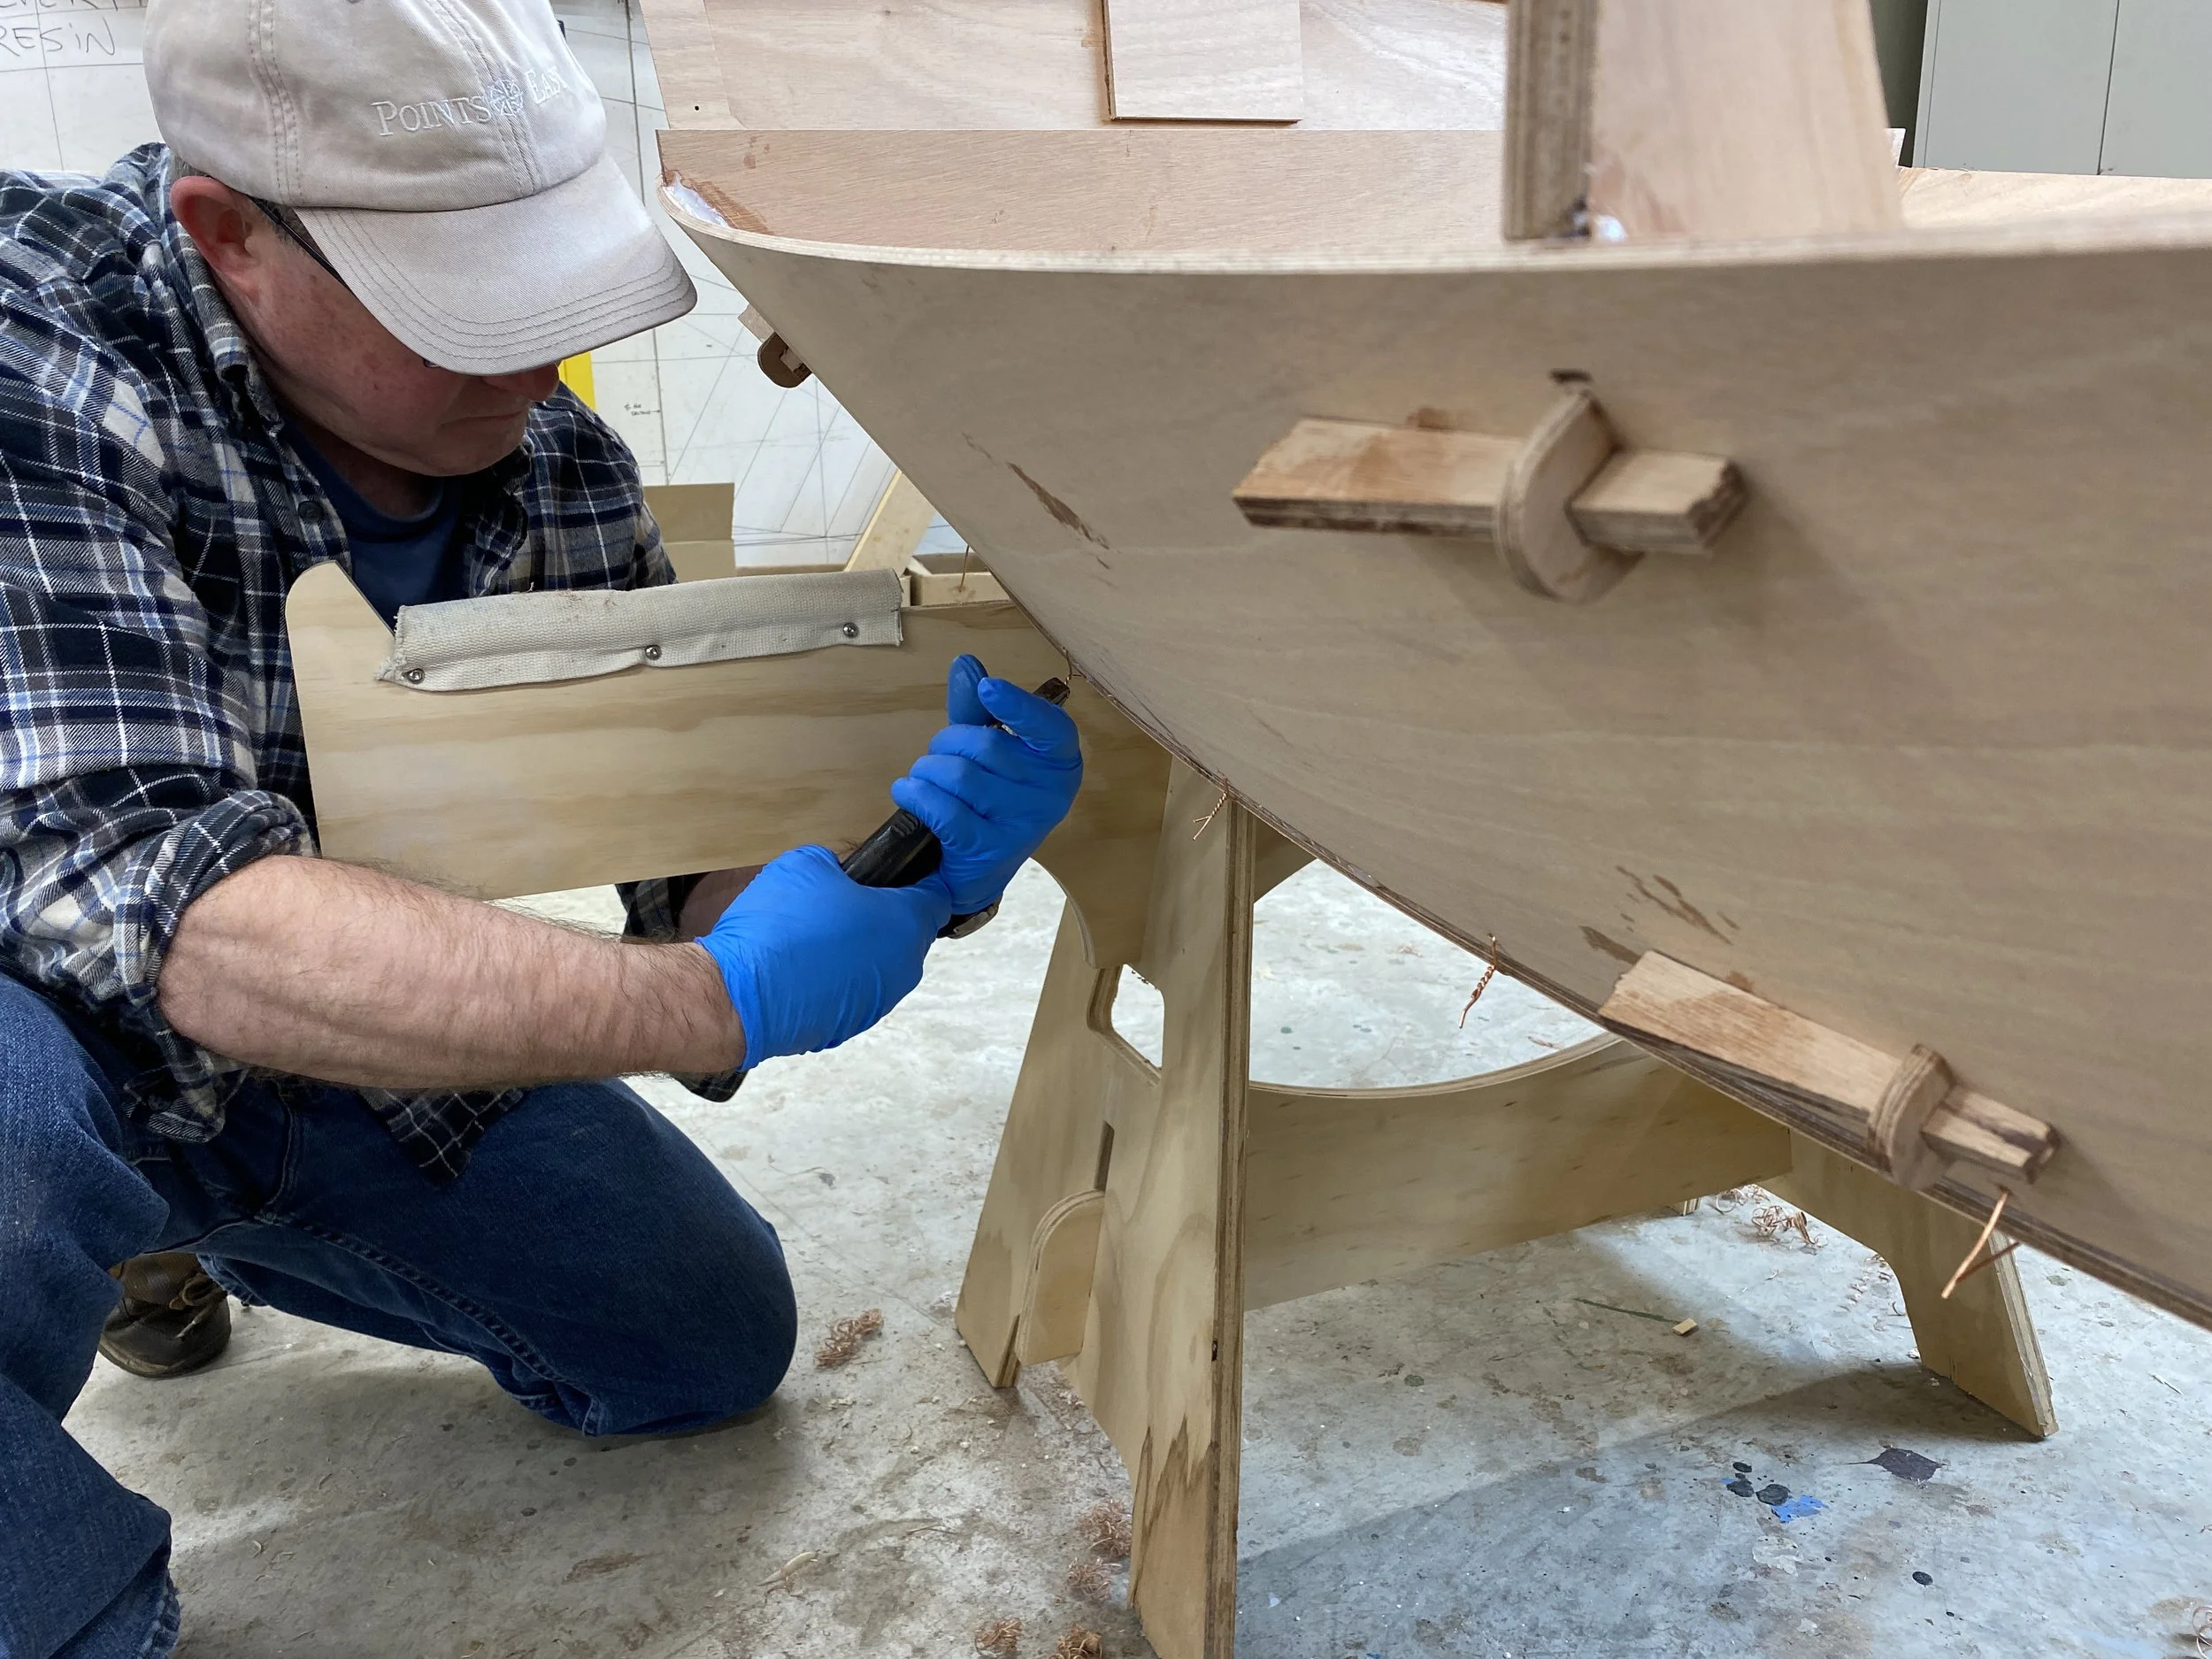
The idea behind the Tab-n-Lock method is to create a way to mechanically interlock the transverse members of the boat - frame and bulkheads - with the side panels themselves. On the frames and bulkheads are precut tabs (about 1 1/4” x 1 1/2” in dimension) that stick into precision cut, matching slots in the side panels. When the side panels are bent around, the slots find their respective tab on each frame and bulkhead and they lock into place securely and without any slop. A small precut wedge holds the side panel in snugly. With this system, there are no bevels used on the frames and bulkheads, saving building time, and they are glued in situ meaning that they do not need to be removed to add glue. Kit builders frame the frame/bulkheads with several pieces of hardwood only on the top and bottom - because the bulkheads are filleted to the hull in lieu of framing and beveling along this joint.

Goat Island Skiff kit being built at home

In this photo you can see the tabs sticking through the side panels. These CNC cut features allow the shape to lock together quickly and easily.

For those who build by hand, remember how tricky it was to bring the side panels together and align them to the frames, dry fit them, then remove and glue? This is literally a “snap” with the kit.

The NS Scarf in a set of GIS planks

The other big difference between GIS kit and the normal build method is that there are precut scarfs on the side and bottom panels. This is another proprietary if not trademark of CSC kits, a feature we call the NC Scarf. It is an interlocking joint like you see in many other kits out there - the interlocking joint is crucial to the ability of the precut plank to align perfectly such that we get what traditionally we call the “sweep and spile” of the plank. But I never liked those ugly joints and I did not want my boats to come across as a :kit boat”. So, the interlocking geometry is hidden on the inside of the overlapping joint and all you see on the outside is a slight wavy pattern, which helps increase joint strength.

There are a few other bells and whistles included in the plywood kit. But we haven’t even mentioned the other aspects of the GIS kit: the solid wood is precut to dimension with scarfs for the builder to glue them to length (only hand tools are needed to build the kit); all the hardware has been figured out and included for the builder; the epoxy kit provides exactly what is needed for gluing, filleting, laminating and glasswork. There are resources I include in the manual and plans that only CSC customers have, such as plans for making the YAWL version as well as how-to instructions and I hope soon some videos.

I would be remiss not to mention a few other cool things we do for the GIS kit: we can precision mill the foils on our CNC router. The shape generated is more precise than even the most skilled hands can generate but if people want to make their own foils we have foil templates that we include. There are the parts and instructions for people who wish to make a yawl version. There are sawhorse cradles to build the boat on, oarmaking kits fit to the GIS, kits for making a birdsmouth mast. And best of all, builders can call me with questions.

Just as the name of this BLOG suggestions, nothing is perfect and we are always striving to improve all or kits. My only regret with the GIS is that I did not 3D model the boat, so there are some limits to what I can do. But it has become a heck of a kit offering that we are proud to ship and - like MIK does with his resources online - make this incredible design even easier and more accessible to build for people in the US and Canada. But people should remember this: you are building a boat. This is not a shelf from IKEA or a birdhouse from Boy Scout days. Even with the best kit ever, it is still a human-built, real wooden boat made from bent wood and shaped by hand with real tools. Now, I should go - I have a 12 year old GIS that finally needs a little TLC and the snow is melting!

Greg Underhill’s GIS was launched last year. A brand-new boat builder with a growing career and young kids, he did a great job!

Build your own GIS from a precut wooden boat kit

Kudoes to Mark Nye for helping me document an early 2nd generation kit for the Goat Island Skiff. Great color!


Third method of kit construction

In the last two posts, I wrote about wood-chine and plywood-glued-lapstrake construction utilized in our kits. I spoke about how these traditional plywood methods, when kitted in a smarter way using CAD and precision machining by CNC, allows a beginner to experience these more “traditional” plywood construction methods in a way that brings joy and success to first time builders. Boats using these plywood construction methods - such as the Caravelle and Drake 17 photos below - have never been more accessible to people than they are now. with our kits.

Wood-chine construction - the chine log is the piece of wood bening along the inside of the join between bottom and side plank.

Lapstrake construction - this is a 3-plank per side Drake 17 with garboard, binder, and sheer. They overlap 3/4” on a bevelled joint and are glued with epoxy - no fiberglass!

The new way

A number of our boats also incorporate a form of stitch-and-glue construction we call it tack-n-tape construction, a form of stitch-and-glue in that the main structural join is formed by welding panels together with epoxy and fiberglass. In Tack-n-Tape, the panels are either bent over a form and fastened down to frames and bulkheads or the panels/planks are bent over a self-jigging set up using our Tab-n-Lock system to hold things together until the epoxy cures. Whatever the means of hold the panels close together, the eventual joint is made the same way: epoxy fills the gaps between the planks and short fillets are made between molds and any wires needs to hold plank edges together. In fact, another method used is small pieces of plywood hot-melt glued on the inside of the hull to hold plank edges together where needed, and then the panels are glassed together on the outside.

Here you can see the tabs from the frames sticking through the plank with wedges to hold. John is adding some wires to the bottom join to draw the ply edges together for the tack-and-tape seam.

Here you can see the top of the plank on a Points East Pram being bevelled to receive the lapstrake sheer plank.

The epoxy filler and fillet and fiberglass over it makes the structural integrity of the joint. This is in direct contrast to the wood-chine, ‘screw-and-glue’ method where the plywood geometrically glued to two sides of a chine log to create the structural integrity; the only glass needed on the outside to help seal and protect the plywood edge. In the case of glued-lap construction, the strength and stiffness of the joint comes from the epoxy gluing the two edges of plywood together along a bevel, effectively doubling the thickness of the hull at every lap - very strong and no glass needed!

Often where I like to use a tack-and-taped seam is on the bottom of the boats. When glassed and graphite coated, the bottom of the boat is like a teflon skillet than can take repeated beaching and is easily repairable. The upper planks would then be glue-lapstrake joined minimizing the amount of glasswork needed to do compared to the equivalent Stitch-and-glue boat. It also makes a cleaner, crisper looking hull - both aesthetically and hydro-dynamically. These boats also will incorporate aspects of the tab-n-lock method where appropriate and as such a truly hybrid systems. Many boats in our catalog use this hybrid system: the Calendar Islands, some of Vivier’s boats like the Morbic-12, and the Deer Isle Koster to name a few.

Hopefully, these posts give you a clearer picture of how we approach construction in our kits. Moreover, why our boat kits are emphatically not Stitch-and-glue kits and why we think that makes them better boats to build and use in the end.

What are the advantages of using Glued-lapstrake plywood in boat kit construction?

A Calendar Islands 18 showing off its lines.

Many of our kits use a hybrid system of Tab-n-Lock, glued-lapstrake, and tack-and-tape construction. Glued lapstrake is sometime regarded as harder to do than stitch-and-glue construction - but while it may require tool use and a couple other boat building skills, it is quite easy once you have seen it done. We are working on videos to show the technique, but the process is thoroughly described with photos in the boat manuals. A great way to learn about this is in our workshops. We have a a great class called Boatbuilding 101. In only 3 days, we cover the methods that I am discussing in these blog posts. Stay tuned for next year’s class schedule on our workshops and classes page.

Some of the main advantages of Glued-lapstrake kit construction are:

  • Self-fairing of the planks creates superb lines on the boat. The overlaps follow each other and help make very sweet, flowing curves around the hull without relying on extra molds.

  • Because of the stiffening and strengthening effect of the epoxy-glued laps, the amount and size of the internal structure required is way less, saving, time, money, and weight.

  • You get to learn some skills using a block plane, rabbet plane, and fitting the joint.

  • Very little epoxy is required, just enough in the joint to get squeeze out and sometimes a fillet on the edge.

  • No fiberglass is required - this is a very clean way to build a boat - no mess!

  • Very little sanding on the planking thanks to the lack of fiberglass.

  • The lapped joints act as longitudinal stringers and add a lot of structure to the boat without making it heavier - glued-lap boats are quite light as a result and make a clean interior.

  • Lapstrake hulls have a way of catching the light, creating shadow lines which make them very beautiful.

  • Some say that the laps help provide some lift to the hull underwater, reducing resistance and also knocking down waves that try to climb the side of the hull.

  • Traditionally lapstrake construction is more advanced, but in our innovative kits, a lot of the hard stuff is taken care of allowing people to do the easy, fun part: making shavings and sculpting the lines of their boat with precut planks!

You can see what I mean here, how the laps create shadow lines that accentuate the shape of the hull. This is why light colored hulls are sometimes nicer than dark colors on lapstrake hulls.

Only the Ilur and Drake rowboats are pure glued-lapstrake plywood - the St Lawrence River skiff kits will also be lapstrake when those are out. Most of our boats, like the Calendar Islands, the KDI, the Deblois St Dory, and other Vivier boats use a hybrid of glued-lap and what we call Tack-and-Tape construction on the bottom. That will be the subject of the next post.

Are your boats Stitch-and-Glue kits? Part 1

This is the most often asked question I get, besides “How tall are you?” or “Do you play basketball”? The answer to the former is 6’6” and the latter question may be answered with “No, do you play miniature golf?”

But seriously, this is a fair question. How are your boats built?…is really what folks are asking, but the assumption is often this: since it is a kit, it must be stitch-and-glue construction. No, that is not the case.

I didn’t like getting this question early on because I knew my boats were certainly not stitch-and-glue but I was still working out a lot of the construction methodology on the fly. What is interesting is that people were and still are very surprised when they see one of our beautiful boats and learn that it was a kit. They exclaim, “THAT is a kit boat!?” But the first question still was always…stitch-and-glue?

Family week, class of 2021 - unfortunately I snapped this after the family from CA already left

Our boats are primarily designed to be real, functional, beautiful boats as a first priority but ease-of-construction and build method is very much a part of the design process. There are a few ways the hulls are constructed depending on the design and they all utilize plywood-epoxy and what I call “Tab-n-Lock”:

  • Screw-and-glue, wood chine construction (the focus of this post)

  • Glued plywood lapstrake (will cover later)

  • Tack-and-tape seam construction (will also cover later)

The “easy-to-build” line up of boats all utilize the first method in the list above - boats like the Echo Bay Dory Skiff and Compass Skiff. They are excellent beginner boats because they do not require a strongback and have few parts to assemble. They also offer great lessons in real boatbuilding skills: bending wood, planing a bevel, predrilling and driving for screws, using clamps and other basic tools, and using epoxy and wood to make good, strong joints. In just a few days of working you can have the hull built without the mess of stitch-and-glue construction.

One anecdote sums up why I do not believe in the perceived superiority of Stitch-and-glue construction. At WoodenBoat School in beautiful Brooklin, Maine where I teach in the summers, I was teaching a build-your-own Echo Bay class. While my students were enjoying making long, cedar shavings with their hand tools, planing down the chines to receive the bottom, someone from the stitch-and-glue class came over, hands gloved covered in dripping epoxy and fiberglass, and said, “oh, cool, you guys get to use real tools in this class!”. One of my students noted how the stitch-and-glue guys already had a hull put together day 1 while they were still making parts (which they were enjoying, but they were clearly noticing that the other class already had hulls wired together). At the end of the week though, both classes had boats built, and our easy-to-build, tab-n-lock, screw-and-glue boats were further along (like they were totally done) and, as a couple students noticed, looking cleaner.

Next blog post we’ll talk about glued lapstrake and tack-and-tape methods to further illustrate our approach to boat kit construction.

The Points East Pram: design, build, and launch!

The crew after 3-days of building

On Friday, July 15th we launched a new boat, the Points East Pram. The Pram has been a productive and easy collaboration with Points East Magazine, a wonderful boating magazine that is free and full of great reading about all sorts of boating from around New England. I always wanted to design a Pram and I’ve always loved the magazine, so it was natural to call the project the Points East Pram.

You can read all about the Points East Pram project in a series of articles published in Points East, starting in November with the article that introduced the project. The important feedback that came out of the survey of the readership was that people wanted a dinghy they could build from a kit and primarily row or sail and motor secondarily. The resulting dinghy had to be stable and have good capacity was also important. I talked about using this feedback in the article I wrote in February after the survey results came out.

One tricky aspect of any boat is how big to make it especially when it comes to a dinghy like a pram that may be used a lot as a tender. Customers of mine want something as small and light as possible to tow behind an 18-20’ boat but someone with a 40-footer and crew to get from ship to shore would want a 10-footer. I decided to start with an 8-foot model because the planks could come out of a sheet of plywood and the model could be scaled up or down from there to get a smaller and larger boat.

One interesting thing to come out of studying the Pram at 7’, 8’, and 9’ lengths was how dramatically the displacement of the hull went up with each foot-long increase in overall length. I talk about displacement in the third Pram article in Points East Magazine.

We launched the Points East Pram on July 15th at Marston’s Marina in Saco on the Saco River on a beautiful 80-degree, sunny day. Here are a few photos and I’ll be back to talk about my take on the results.

Happy people rowing the first ever Points East Pram. More later on what we thought of her and more launch photos.